 ->
-> ->
->
November 06, 2004
It's been nearly 4 months now since I last made a
change to this tutorial, and mostly because people stopped caring. But that's
ok, I thought it was about time for a change anyway. Thanks to my recent
exchanges with the all-knowledgable JJWE, I have learned a few techniques that
will eliminate the need for cleaning and resizing as well. These are two of the
most annoying chores to do with sprite capturing, and I'd like to share my new
techniques for eliminating those processes altogether. Since ArtMoney is a big
factor in this process, the tutorial is called the 'Artmoney Tutorial' now. It
will be more in-depth regarding this useful tool this time, and my tables should
work for everyone now because I have learned how to apply offsets. What does
this mean? Read on to find out.
What you will need:
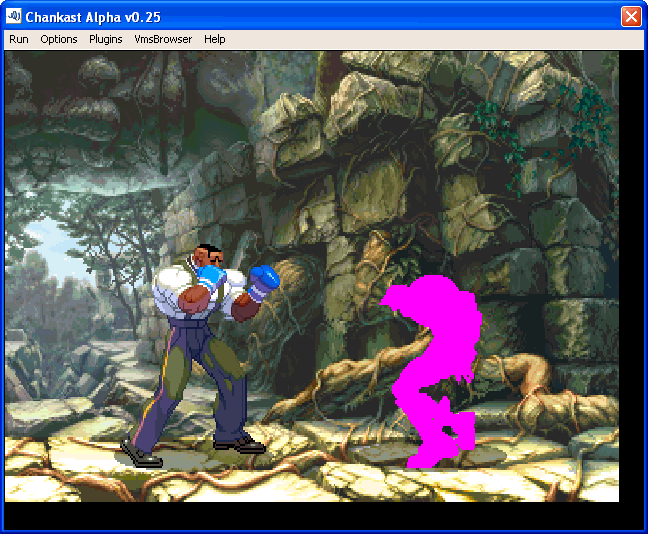
Chankast - the emulator that lets you play Street Fighter III - Third Strike. Please make sure you have a decent PC and graphics card before attempting to use this program - you have been warned!
Animget - a useful tool for capturing images.
ArtMoney - the main tool used for the tutorial. What it does is let you alter values in memory during the running of the emulator, resulting in dynamic changes in your game. Doesn't only work for Chankast, you can use it forever game you want, lots of fun once you get to learn to use it properly.
ImageMagick - image processing and conversion tool. It's command-line, but it gets easier if you use some handy DOS-based batch programs to quicken the tedious tasks.
Animget and Imagemagick are completely optional, they are simply useful programs for me. So if you have your own image capturing and editing tools that suit you better, by all means use those instead. This tutorial will be very step-by-step, making sure everything is plain and easy to use. So forgive me if I seem condescending at all, it's just that not everyone is at the same level regarding computer use. Also, some of these programs are intimidating at first, so don't be afraid! This may laugh, but you wouldn't believe the amount of emails and messages I got saying that some of the above software is too confusing to use. This guide will try to demystify these programs and show you techniques in how to use them effectively. By the way, All these programs are free, so that is another reason to use them instead of more expensive alternatives.
I will not get into the details of installing all the programs, because that should be self-explanatory. Usually it's just a zip or exe file that you need to install like any other Windows program. The focus here will be how to use ArtMoney to manipulate the game to your advantage. So without further ado, start up Chankast with Street Fighter III - Third Strike, and in the words of Brian Fellow, "Let's get going!"
Now before we begin, I admit I didn't use AnimGet to take these pictures, rather I went with SnagIT instead. This program is simply better for taking static shots and resizing and such. It used to be part of my old tutorial, but IMO it's simply no good for taking many snapshots in a row for things such as game sprites. That's why I use AnimGet in this tutorial instead of SnagIT, incase anyone was wondering.
The order you open up the programs doesn't really matter. But open them all up now, because you'll need them all for the capture process. I'll start with ArtMoney in the tutorial. You'll be confronted with the following screen when you start it up:
-> ->
![]()
Just agree to the terms and hit 'OK'. This window might come up quite a bit, actually, don't mind it. The extra features that come with the PRO edition don't really apply to us, they are rather complex search methods that aren't necessary. Ok, so you started it up, you should now see this screen:
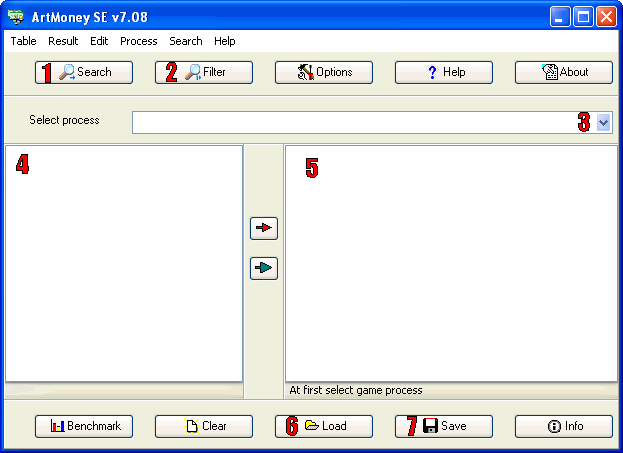
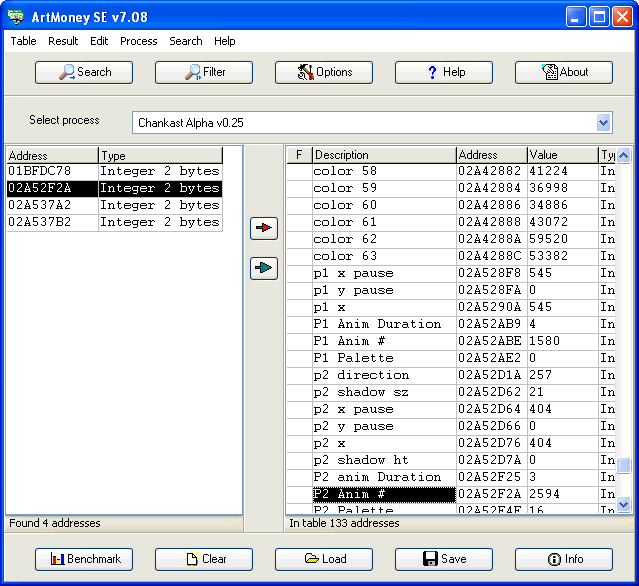
The marked areas on the screenshot are of importance and I'll just briefly describe them here:
1 - 'Search' - Search will be used to look for values in memory. This will only be used the first time you search for a new value, every new search for this value will be searched for using the 'Filter' button.
2 - 'Filter' - This is used after 'Search' is used once. It filters the searches down based on certain criteria, which will be expanded on later.
3 - 'Process Selector' - Using the pull-down menu here, select the running Chankast process. This tells ArtMoney which process to search in.
4 - 'Found Addresses Window' - If you tell ArtMoney to do so, it will dump all the found addresses in here. Usually it's not a good idea to do this at the very start of the search, as thousands of unintelligable values will be dumped here on the first search.
5 - 'Address Editor Window' - Here is where you'll be editing the addresses. The arrows between these two areas push all the values to this window. The top one puts the selected values in the left window to the right, while the bottom one puts all of them in.
6 - 'Load' - This loads up an ArtMoney table. I will provide you with some that I have done, with help from JJWE for some addresses.
7 - 'Save' - Save the table once the values have matched up with your PC. This will be explained later.
Now if you want to mess around with options go ahead. I'll highlight the areas of interest for you
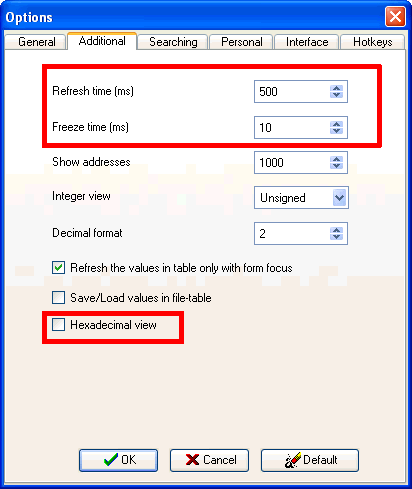
In the 'Additional' Tab, The top portion played a great role for me when I was ripping 'non-flashing' Gill way back when I first started using ArtMoney. But after I discovered the animation test method, I sort of disregarded this part. Either way, I found the values above for refresh-time and freeze-time to be good enough to hold the freeze on Gill to prevent him from altering his colour. You see, if these values aren't low enough he would rapidly switch between colours even if I had his colour address frozen! This happened because as the game was feeding him his new palette, ArtMoney wasn't quick enough to turn it back to the value I had frozen. So that's why they have to be low to work. The bottom box I highlighted is useful if you want to see the addresses in Hexadecimal mode. It's just nice sometimes to be able to see how the game works, because this is much closer to actual program code than the Integers we will be using.
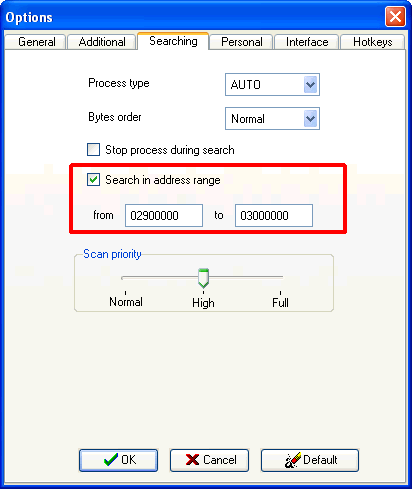
If you pick the 'Searching' tab, another valuable option is visible: 'Search in Address Range'. This will DRAMATICALLY reduce search times for you, if you can find the correct address range that Chankast uses. The problem though, is that every PC will have a different address range, so mine might not work for you. Even mine is exaggerated a bit, I could have made it much closer if I wanted to. I simply based it on the lowest and highest (useful) addresses I found for the game. Since all my successful finds were within this range all the time, it was pointless for ArtMoney to search such a large range (within the process of Chankast). So once you have know the range yourself, you can put this in here and tick the 'Search in Address Range' box.
Now, we still haven't really gotten into the program yet. You could go either way with this. You could search for values yourself, or you can simply download my table. I will continue the tutorial assuming you have this table downloaded. So here it is:
Once you have the table downloaded, click the 'Load' button and click on my table (Third Strike.amt).
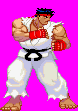
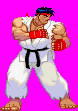
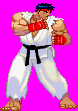
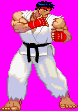
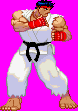
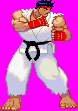
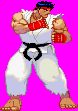
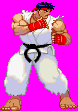
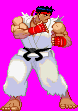
The table that is loaded contains values I have toyed around with for a long time. You'll find lots of useful addresses there that you can change to your liking. Unfortunately, it probably won't work for you right away. This is due to Chankast loading the game in different address ranges depending on your system configuration. To remedy this, we must now offset the values to match your system. The following process will (hopefully) accomplish this. If it doesn't, I have failed miserably. So I will try to make it simple. I came to the conclusion that a very easy value to find on your own is one of the character's frame numbers. Since these are hard-coded values, they are the same for every person. They are not dynamic values that change every time you restart the game. So I randomly chose Ryu for our address-matching. Take a look at the following table:
 |
 |
 |
 |
 |
 |
 |
 |
 |
 |
| 2593 | 2594 | 2595 | 2596 | 2597 | 2598 | 2599 | 2600 | 2601 | 2602 |
These will be the numbers to search for. Start a game, preferably a VERSUS or TRAINING game, so that you don't get hit by your oponent, and choose Ryu. It doesn't matter what colour he is or if it's player 1 or player 2. Once the match has started, pause the game and remove the pause window by pressing the button you asigned to Y. This isn't completely necessary now but you'll want that box out of the way while ripping, right? While the game is paused, go back to ArtMoney and click the Search button. You will get the following dialog:
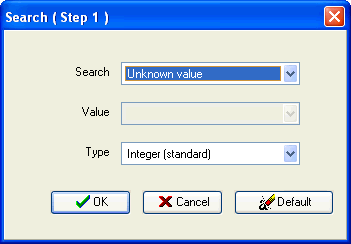
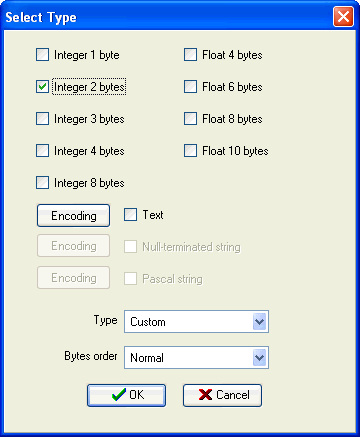
Change the 'Search' value to 'Exact Value', and within the 'Value' field input the number that corresponds to one of the 10 Ryu images above. For Type, pick 'Custom', and pick 'Integer 2 bytes' as in the following screenshot, and hit 'OK'.
Pick OK again in the Search Dialog Box and wait. The box will look similar to this:
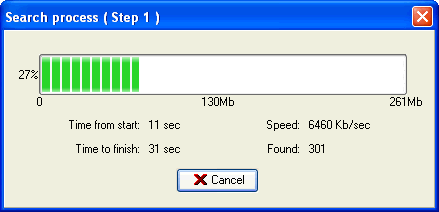
You might have to wait a while depending on the speed of your computer. The values found will probably be anywhere from 300-1000 values or so. Don't let this number alarm you, we will whittle the matches down now with the 'Filter' option. Unpause the game and let Ryu bounce around a bit more. When you pause it again, make sure a different frame of his stance is showing than last time, and try to make it an obvious one like 2595 or 2596, because you could accidentally be searching for the wrong value. The subtle ones are a bit harder to spot, just look at his belt or the bottom of his gi. Pick 'Filter' in ArtMoney and input the new value that Ryu is at, and hit OK. The search should be a lot faster now and the values far less. On my search I was already down to 4 values only! You can try again to filter it down even more, but sometimes the number won't get narrowed down to just one, so you might have to live with a small amount to try out. The only way to check which one of the values you found is the 'Real Deal', is to place all the addresses into the table. Do this by clicking the GREEN ARROW. Once you've done this, ZERO the values one by one.
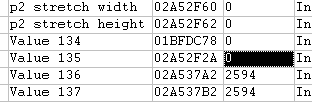
Watch your Chankast window carefully while you are doing this, because the one that makes the Ryu sprite disappear is the value you want! Ok, now look at the address that made Ryu disappear when inputing a 0, and highlight this value on the left side. Also, highlight the value called 'P1 Anim #' or 'P2 Anim #' (depending on what player Ryu is). Your screen should look like this:
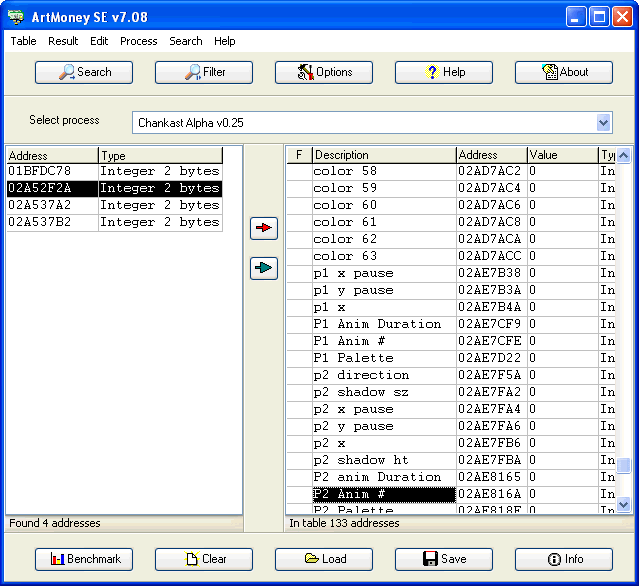
Ok, we are almost done 'synching' these values. Only one small step to do, and that is to offset all values by this number! To do this, simply press 'ALT+A'. If this is too hard for you, it also works by right-clicking over the highlighted value on the right side, select 'More', and 'Auto Apply Offset to All'. Lo and Behold, your table is now synched with my values. The Value column should now be filled with meaningful numbers within the 2-byte range (in most cases, anyway). Play around with the numbers if you want, or simply read on for in-depth explanations of everthing in my table! I really hope this worked for you, because I've tried it several times myself with 100% success. For an example of what the screen should look like now, see the screenshot below:
Now before I do a rundown of the values, I must first appologize for the clutter within this table. A lot of 'sets' of values aren't complete, and some values seem a bit useless. The reason for this is because I am too lazy to organize it all. If you want a clean looking table expand on this one yourself, it's really customizable. All the 'Description' values are notes I put in myself, and these can be changed by simple double-clicking on them. Also, remember to SAVE this table now as it is now customized for your PC.
Click the following link to see an example of what you should see if you have used the above values correctly: LINK
And to think, I used to do this all by hand! My how the times have changed, haven't they? Too bad it's a little too late... Anyway, we'll get back to this later on when we get to the scaling portion of the table.
Gill: 1 - 1438 Alex: 1568 - 2568 Ryu: 2592 - 3531 Yun: 3552 - 4990 Dudley: 4992 - 6116 Necro: 6144 - 7374 Hugo: 7392 - 8376 Ibuki: 8384-10180 Elena: 10208 - 11758 Oro: 11776 - 13264 Yang: 13280 - 14583 Ken: 14656 - 15707 Sean: 15712 - 16779 Urien: 16800 - 18247 Akuma: 18272 - 19439 Chun-li: 19456 - 21100 Makoto: 21120 - 22987 Q: 23008 - 24434 Twelve: 24704 - 25851 Remy: 25856 - 27019
Now is when you can open up AnimGet to prepare for snapshot taking. The program will only take a snapshot when the image has changed, so don't worry about being quick. You'll also want to assign a hotkey value to your keyboard for advancing the number in that memory location. Do this by Right-clicking on the 'Anim #' value and picking 'Edit'. When in Edit Mode, pick the 'Special Hotkeys' tab on the top. This is what you should see::
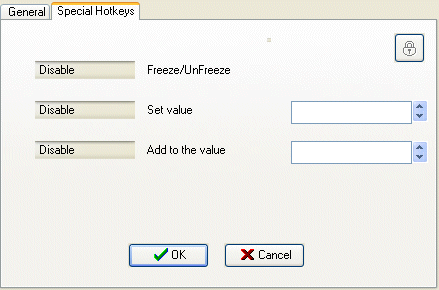
In the 'Add to the value' box to the right, put the number 1. Click the 'Disable' box to the left of it. The following dialog will pop up:
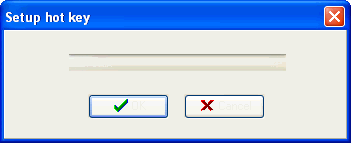
Input a sequence of keys you want to use to advance the frame. I personally use CTRL-+, but you can use whatever you want. If you don't want to use AnimGet for capturing you can also assign your SnagIT shortcut combo here as well, such as CTRL-P or whatever. That way, not only will you trigger the next frame of the character but also a snapshot from SnagIT. Remember while you are advancing the frames to give the emulator input every so often (every 50 frames or so), to avoid the DC's screensaver from kicking in. Or perhaps you can disable the screensaver in the bios, I can't remember.
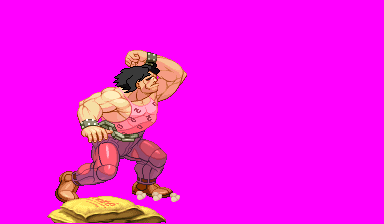
Notice how there is a sandbag in the way of Hugo? We can get rid of that by zeroing all the BG-object values in the top portion of the table until it disappears. The little dust clouds are annoying too, so try to avoid those by doing a move that doesn't call up little effect sprites. Put your character's starting value in the memory location we found earlier. Hugo's starts at 7392. Simply make sure you have Chankast in an accessable area and startup Animget by clicking observe->Start.

Now pick Chankast's window and start increasing that value using your hotkey you chose earlier (mine was CTRL-+). Just hold on to to those button while you're doing this, it works much nicer than tapping them over and over. It may be tedious going through 1000+ animations, but at least you'll have a complete sprite set a LOT quicker than going through all your character's moves manually. And remember to press a direction key or else assinged to Chankast's controller to avoid that horrible dreamcast screensaver. Also, don't be alarmed that a lot of the sprites are simply a head placed in a random location. This is Capcom's 'filler block' between frames, it is something you'll have to deal with when cleaning up your sprite set later on. When you're done, go to Animget and pick 'Screenshots ->save'.

When that's done (might take a while), you'll have a complete sprite set in the AnimGet/shots folder!

As an extra note, Ibuki is a bit of a problem because of her hair sprite. Simply move her sprite away from the hair strand or disable it. That would mean advancing her sprite until it EQUALS her hair sprite, searching for that in memory, and so on. The easiest solution her is to simply pause the game when Ibuki is using a frame where her hair is attached to her sprite, such as her tuant, jumping Strong, etc. She is a tough character to deal with in her own right, so good luck constructing her because it will be quite a challenge for you (in M.U.G.E.N. that is).
So that's my updated tutorial. Notice how I didn't even use ImageMagick this time, but I will later on when I separate this tutorial into sections to spare the 56K modem people.
peace!
Joram "Zwei Fuss" Nowak
jnowak@uoguelph.ca 
Back to the SF3 -
Third Strike gifs...